
Description
Parallel ridges to define a path edge
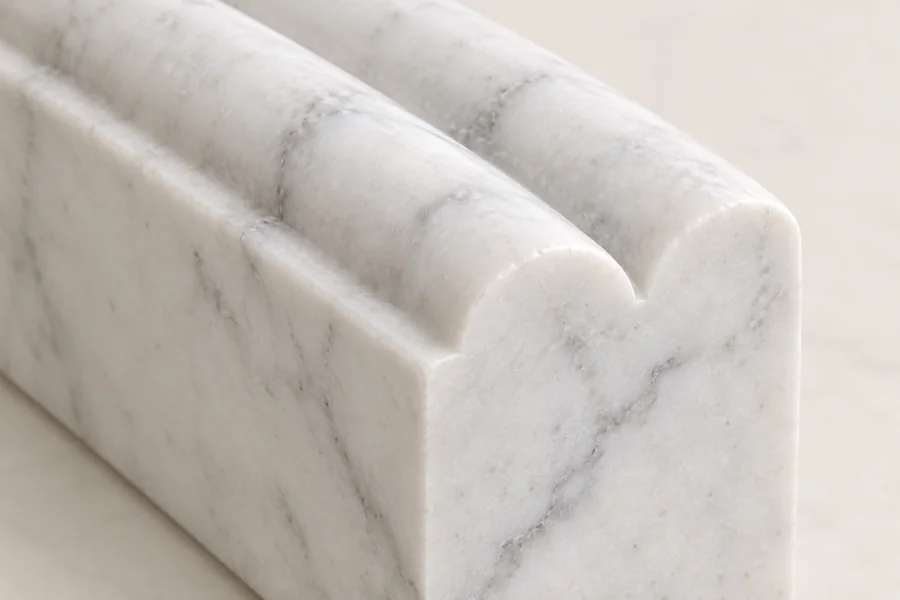
The double ridge marble border design uses two rounded lines along the top of a straight rectangular block. Flat square ends provide a clear starting point for discussing how a repeated run will join and terminate.
Connect the blocks on a measured plan
The proposed 45 × 10 × 12 cm dimensions describe one approximate component. Mark the full path length, corners and end conditions before deciding the number of blocks. The illustration represents a single design, not an installed run with confirmed joints.
Select the white marble and exterior finish with the maker. Ground preparation, fixing and any adjoining walking surface require site-specific decisions by the installer. The raised ridges are an edging profile rather than a tested walking or slip-resistant surface.
Set the border around your pathway
Provide the layout in a twin-ridge edging enquiry, including changes in level and the required quantity. Confirm installation scope, packing and price in the quotation. AI-generated images show the proposed form; actual stone variation and production timing are established for the agreed order.
Two lines running beside the path
The paired ridges give the top of the block a repeated linear detail, while the rectangular body provides a clear outer outline. Consider how those two lines will appear along the full path rather than judging them only in a close-up. A long run can create a more continuous visual guide than a single isolated block. Review the proposed height beside the adjoining planting and paving, with the intended exposed faces shown on the layout so the decorative profile can be assessed in context.
Show every joint on the border plan
Flat square ends provide a starting point for discussing adjoining pieces, but the complete run still needs agreed joints and terminations. Ask the maker and installer to show how the two ridges will relate across each connection. Include the beginning and end of the path, nearby steps and any place where the stone meets another material. The component’s approximate length is not enough to determine the final quantity, because the actual layout and approved joint arrangement affect how the border will be assembled.
Develop corners as their own details
Mark every turn on the site drawing and ask how the linear profile will continue through it. A corner may need a separately developed component or another approved treatment rather than a simple repetition of the illustrated straight block. The same applies where the surrounding ground or path level changes. Have the responsible installer assess those conditions and coordinate the result with the stone maker. Keeping the corner and level details in the final order helps avoid leaving important decisions until the delivered pieces are being installed.
Review the practical boundary separately
Explain what lies on each side of the proposed border and what function the edging is intended to serve. The installer should determine the complete setting and support requirements for that site. The decorative ridges do not establish a walking surface, slip rating or retaining specification. If the project requires particular performance, have that assessed and confirmed before selecting the final component. The stone drawing can then record the approved shape and dimensions without using the rendered appearance as evidence of practical suitability.
Coordinate the light stone with adjoining finishes
Compare the selected white marble with the path material and other stonework in ordinary site light where practical. Natural markings may cross the ridges and side faces differently from block to block. Discuss whether you prefer a quieter selection or more visible variation, subject to the material available for the commission. Ask for the exterior finish and visible edge treatment to be recorded with the profile drawing. A generated close-up suggests a form, while representative material references are needed to agree the actual appearance.
Keep a record for the completed run
The final quotation should identify the component sizes, count, special pieces and included installation scope against the approved path layout. Confirm how the blocks will be packed and inspected before setting. Check the ridge ends and visible edges on arrival according to the supplier’s instructions, then keep the approved specification with the landscape records. Those details will help with future cleaning, repairs or an extension of the path. Any later change to the surrounding levels or use should be reviewed against the complete installation rather than the stone profile alone.
Explore a related design direction
the wave-crest edging stone uses a rising curved top instead of two straight ridges. the bark-relief plinth adds texture to a separate display base. Compare these treatments when coordinating the amount of carved detail around the path.
The twin ridges and exposed side faces should be maintained for the selected material and finish. The Natural Stone Institute care guide offers general guidance to discuss alongside the care instructions for the commissioned piece.

Reviews
There are no reviews yet.